How to draw Kevin

Every time I’ve put serious effort into drawing Kevin Olusola well, I’ve greatly improved as an artist. Drawing to prepare this tutorial was no exception. Kevin’s deep brown skin tends to pick up strong highlights and shadows, so this tutorial walks through creating a fully-shaded pencil portrait.

For this tutorial, you’ll need these materials:

  • A sheet of white paper
  • A pencil with an eraser. I used a #2 pencil, but if you have a graphite set, it will serve you even better.
  • Several cotton swabs, or tissues, or both. These are used during blending, to make shading nice and smooth.

First we’ll outline to ensure correct proportions and facial feature placement. Then we’ll shade region by region. In each region, we’ll fill, then blend, then detail.

Here’s our reference photo: a nice shot of Kevin smiling and facing the viewer.

ReferencePhoto2-cropped
Reference photo

1. Outline Head and Shoulders

As we outline, we’ll apply these principles:

  • Work large to small.
  • Measure proportions.
  • Look for shapes and angles.

We work large to small, to ensure that greater proportions are correct before we add smaller details. Even the most attentively drawn details will fail to capture a likeness if their size or placement is wrong for the subject’s face.

Let’s measure proportions to get the head shape. First I draw a vertical line of symmetry, then a horizontal line for his eye level, and give it a width. His face is turned a little, so I place proportions as I see them and draw the part of the line to the right of center longer than the part to the left. I notice that the pupils of Kevin’s eyes are about halfway between the edge and center of his face, on each side.

Now I’m placing guide marks along the center line of symmetry. A little less than half a face width up from eye level: his hairline, then a bit above that, the top of his hair. A little less than half a face width down from eye level is where Kevin’s upper lip meets his teeth, and then less than half a face width down from that, his chin. The corners of Kevin’s mouth happen to line up roughly with his pupils, so I extend guides down from there.


That’s enough marks to guide me as I outline his face. Chin width isn’t far off from the width of those corners-of-mouth guides I made, with some rounding. (As I try this out, I see that my chin mark is a little off, so I adjust it.) And then the corner of his jaw (again, rounded on Kevin) is vertically pretty close to the level of the mouth line, and horizontally lines up with his head width.

Then I outline his head above the eyes in two lines: the hairline (where forehead meets hair), and the line for the top edge of the hair. Notice that the edge line curves out a bit from the face at eye level, and the hairline doesn’t curve in much from face width. Kevin has a high, wide forehead; observe carefully and draw what you see. The hairline and edge line follow similar curves up top. And here’s what I have now:


Step back and check whether the head outline looks like Kevin, or if anything needs fixing. I’m satisfied with it so far, so I look for shapes and angles as I add some more basic face shapes: ears, beard line, imaginary eyebrow lines, and here we are.

But before we dive into face detail too much, let’s draw in his jacket and shirt. Notice where face meets jacket; that’s where to start your mark. Watch the slope of the jacket on his shoulders and try to match. Now trying to copy the curves of the jacket and shirt collars, and here’s what I have.


2. Outline Facial Features

Now I look for some more shapes and angles for drawing the face. I’ve sketched some diagonal lines that the nose and mouth seem to reach to, so I sketch those as guides. Then I sketch the basic shapes of eyes, nose, and mouth.

Everything’s roughly where it belongs, so I’ll go ahead and add more detail. I shape the eyebrows, eyes, nose, and mouth carefully based on what I see. I reshape the diagonal nose and mouth guides to match the smile folds on Kevin’s face.

This is enough detail now, that it’s time to remove the guides and bring the eyes to life, to prepare to take a harder look for minor adjustments to the outline before we start shading.


A few minor adjustments and a mustache later, I’m satisfied with my outline.

Here’s an animation of the outlining process:

KevinDrawAnimation

3. Add Shading

We’ll be shading a dark-skinned man wearing a black jacket, so a lot of graphite is about to go down! I’m left handed, so to avoid smudging my work and my hand as I go, I’m going to shade region by region, right to left. If you’re right handed, I recommend shading left to right.

We’ll shade each region in three steps:

  1. Fill
  2. Blend
  3. Detail

Below I show each step.

Left: reference photo. Middle: jacket filled but not yet blended. Right: blended.

While filling, watch for light-dark variations on the jacket in the reference photo, and shade lighter or darker to match. A graphite set has pencils of different light and dark values, and can help you get darker dark shades, subtler variations in light shades. But even a #2 pencil can give you a broad value range as you press lighter or harder.

To blend, rub with a tissue or cotton swab. Try to avoid blurring where there should be a sharp delineation, but if some blur does happen, you can fix this with eraser and pencil during detailing. For now, I hold off on detailing, because most of this region’s details are shared with the collar region, which I’m shading next. Here we go:

  1. Fill. Aim to match the lights and darks you see.
  2. Blend. Rub with a tissue or cotton swab to make it smooth.
  3. Detail. Sharpen edges. Use eraser to brighten highlights, and pencil to darken shadows, and then spot-blend as needed. Add finishing touches until the region looks complete.

Kevin’s neck and face are next! I forgot to show progress pictures of neck shading, but it was straightforward, mostly a gentle dark-to-light gradient, filled and blended, with a thin shadow near the collar that I touched up while detailing.

Here’s progress on one side of Kevin’s face.

  1. Fill. With the shading so rough and the hair not yet colored in, Kevin looks like an old man! But the important thing here is that I”m watching for highlights and shadows in his face.
  2. Blend. Now it’s smoother. When blending, I’ve found that an already-darkened cotton swab can darken areas slightly, and a tissue can lighten areas. For precision blending of small areas, a clean cotton swab works well.
  3. Detail. Now I use eraser and some spot blending to restore a highlight I’d missed. I restore details that had been lost in blending, and I add more detail to the eye. I start to fill in the hair.

Now the hair needs some blending and detailing of its own. I filled with a medium shade to give the hair a gray base shade; now I blend it. Then I draw tight black loops over the gray base shade; this gives his hair and beard a textured look.

As I’m moving right to left (and again, I advise right handers to shade left to right), I shade the shirt next.

  1. Fill. Since this is a white shirt, filling just means adding a few light lines where I see shadows and folds.
  2. Blend. Now it’s smooth. Some edges will be blurred, but we take care of that when we…
  3. Detail. Now the buttons are visible again, and the collar has crisp edges.

This is where it gets interesting. I fill and blend the chin and mouth. Again, I detail the beard with tight coils.

Lip detailing is your chance to make fine adjustments to lip shape; slight adjustments can make a big difference to likeness and expression, so examine the reference photo carefully. Lower lip details for Kevin are complex: there’s an uneven “edge”, not seen on light skinned people, where skin pigmentation gives way to an underlying pink.

I draw in the teeth only after shading the surrounding area. To start drawing teeth, I recommend first drawing the dark shapes around them: the bottom edge of the teeth, and the gums, where visible, just above. These will help guide the lines between teeth, which are typically best kept light.

Now I move to the nose and middle forehead. Fill, blend, detail. These progress pictures show me at the start of filling, and then when I’ve filled and start to blend, and then once I’ve blended and use my cotton swab to make the next region’s highlights a light gray. As you get used to shading, blending, and detailing, one step will flow into another as second nature.

Now the left side of the face. Fill, blend, detail. Now both eyes are fully detailed. We’re getting there!

While I was detailing, I saw some areas that needed darkening about the eyes and nose, so I penciled them in darker. After blending, they look like the picture on the right.

Now the rest of the hair. Fill, blend, detail. I also adjust some highlights and shadows on the face; for instance, that one highlight near the hairline is more defined.

The face is almost complete. Before I move onto the remaining side of the jacket, I blend the shadows I’ve just added, and take a good hard look at what needs fixing. I give the lines between the teeth a more natural shape, with varying thickness. I fine-tune eye and lip and beard details and numerous other things until I’m reasonably satisfied.

Time for the rest of the jacket! I adjust the shape of the collar, then fill and blend it.

Then I fill and blend the jacket beneath, and then detail all this side of the jacket together. I didn’t go dark enough in shadows at first, so I darken now.

I blend my last bit of darkening on the jacket, and then step back and look for final touches. I fix the shading on the nose, other slight fixes to face and beard details, and now I pronounce it good enough. I sign it. Done!

Even now, I see that I would have been better off stepping back more often, and comparing my drawing with reference photo side by side while I worked, just the way I’m showing them in this tutorial. There are errors I missed clear back in the proportions-placing stage! (And now you have the opportunity to spot them and not repeat my mistakes.) But at this point I’ll let it go, and remember this:

Art doesn’t have to be perfect to be wonderful.

Here’s a progress animation of the entire process.

KevinFullAnimation

Getting Kevin’s shading right was quite a project!

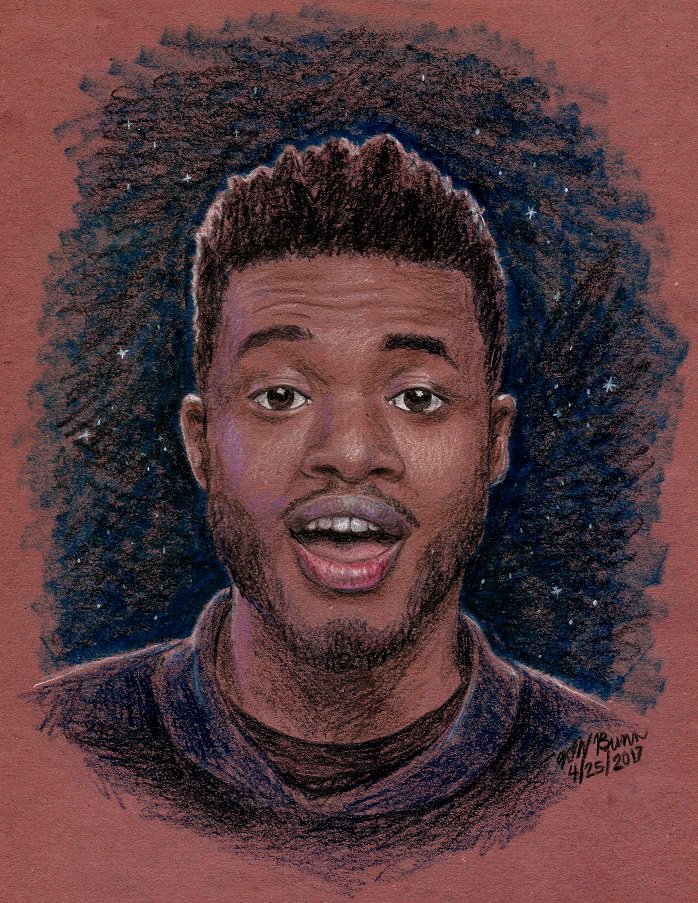
By the way, months ago when made my first serious attempt at drawing Kevin, this was before I’d learned much about blending. I foresaw that my lack of skill at shading dark skin on white paper would be a problem, so I ended up drawing him with Prismacolors on brown paper. Bringing depth to his face by drawing highlights as well as shadows felt like magic from start to finish. I highly recommend this approach: if you have access to a soft white colored pencil and some brown paper, give it a try!

Kevin - McKathlin
Kevin, drawn with Prismacolors on brown paper.

This tutorial is part of a series on drawing the members of Pentatonix:

How to draw Kirstin

In this tutorial, we will draw a head-and-shoulders pencil portrait of Kirstin Maldonado, applying the following principles:

  • Work large to small.
  • Measure proportions.
  • Look for shapes and angles.

To celebrate Kirstin’s recent EP announcement, I’ve selected her EP cover as the reference photo for this tutorial. (I won’t be adding the lettering in this tutorial, but you can if you like!)

ReferencePhoto
Our reference photo: Kirstin’s EP cover

We’re going to work large to small, so first we’ll outline the face, hair, and shoulders, after which we’ll place facial features, and then go into finer details.

1. Draw outlines of face, hair, and shoulders

Let’s start by sketching the head shape. First, measure proportions. How does the width of the head at eye level compare to the height? At my estimate, her head’s width (not counting hair) about 2/3 of its height. As typical of the female face, her eye level is about halfway between the top of her head and her chin. I sketch in some guides: a vertical line of symmetry down the face, and crossing it through the middle, an eye level line 2/3 of that length.

Now let’s look for shapes and angles that will help us outline the face. The corners of her jawline are soft, not as angular as Mitch’s, but it looks like they’re slightly in from the head’s full width, and they’d be on level with a horizontal guide line placed halfway between eye level and chin. I’ll sketch in that line now. We also need a guide for the hairline. Conveniently, it’s about halfway between eye level and the top of the head.

Now sketch the jawline, with a soft curve that passes through the jaw corner points we’ve just figured. I’m about to sketch the hairline, but I could use some more help getting the shape right. I see that the corners of the hairline (behind the feathery-lace bangs) line up with the corners of Kirstin’s eyes.

So let’s place points for the corners of the eyes. Jack Hamm‘s triangle rule can help us place the corners of eyes: the mouth, and the corners of the eyes, typically form an equilateral triangle. Kirstin’s face conforms to this rule. So if I place the mouth, that will help me place the corners of the eyes. Kirstin’s mouth is fairly low on her face, below those jaw corner marks we found earlier. Now I use the center of the mouth and the eye level line to form an equilateral triangle; I tend to turn my sketchbook sideways to make sure triangle’s sides are all the same length.

Now that I have the eye corner points, I extend guides up from them to the hairline for the corners I wanted. Connect the dots, and the hairline is sketched.

Next, outline the hair. Let’s go ahead and add her ears to help us place her hair. Her upper hair outline extends from the head a little farther than her ears do, following a round curve on either side of her head up to the crown. (While I was at this, I noticed an error in how I curved the hairline, and I corrected it.) Don’t get lost in the braids and bangs yet; we’re just doing a rough outline.

The part of Kirstin’s hair that’s down flows from behind her ears to the breadth of her shoulders. So let’s place the shoulders to have a point of reference for placing her hair. Let’s start by measuring from chin to collarbone: it looks like just a little more distance than the distance from Kirstin’s mouth to her chin. Some people’s collarbone dips from the shoulders, but as it happens, Kirstin’s is fairly level. So we can go straight out to the side to measure from collarbone to shoulders. About a head’s width either way takes us to a point level with mid-collarbone, where the shoulders are sloping. Connect each of these points to our mid-collarbone point to make our collarbone lines. Then draw gentle curves outward to draw where shoulders become arms.

Next is the neck. It looks like the points where neck meets face are directly below the eye corners. Make a scoop-slope from these points to the shoulder points we found earlier, and you’ve finished outlining the shoulders. Now we’re ready to draw the hair outline that extends from the tops of the ears to the outside of each shoulder.

2. Place facial features

Now we’re ready to draw Kirstin’s face! Measure proportions: the eyes are one eye width a part, and the nose, slightly wider than an eye width, and the mouth, a bit wider than the nose. I add the imaginary line the eyebrows follow; Kirstin’s are quite straight. As I’m sketching the eyes, I draw in the wings from her eye makeup, since these have such a strong effect on how the shape of her eyes is perceived. I draw in the nose shape, and the lips’ shape.

Now it’s time to erase the guides and see what’s left to do.

At this point, I add some details to the eyes to make her look alive. This raises the bar for how well a likeness must be captured. Now I examine the face for anything that needs to be adjusted to look more like Kirstin. At this point I struggle and struggle with nose, mouth, and chin placement. I give the nose its distinctive shape: see how it has width at the bottom but curves in to a narrow bridge? That’s important to get right.

3. Add details and shading

Now that the face looks about right, we’re ready to add other details: sketch the bangs and earrings, outline locks of hair, etc.

Next is shading. For Kirstin, it’s essential to make the shading on her skin soft and smooth. Different artists use different techniques, but I’ve learned as I go that this order of operations works well for shading:

  1. Identify light levels of different areas of the picture, and lay down rough shading.
  2. Use a cotton swab to blend until the shading is smooth.
  3. Use an eraser to make highlights. Blend again if needed.
  4. Add hair texture and other fine details.

One more word of advice: every so often, step back and look at your work from a distance, or take a picture of it and look at it on a screen. This can help you spot and correct errors that you otherwise might not notice until you’re all done! Right now I’m looking at my shaded picture of Kirstin and seeing things to correct, but I’ll forbear and let my errors be a lesson to you.

Here’s a recap of the steps:

This tutorial is part of a series on how to draw members of Pentatonix:

  1. How to draw Avi
  2. How to draw Scott
  3. How to draw Mitch
  4. How to draw Kirstin
  5. How to draw Kevin

How to draw Mitch

In this tutorial, we will draw Mitch Grassi’s likeness in outline, applying the following principles:

  • Work large to small.
  • Measure proportions.
  • Look for shapes and angles.

We’ll keep it simple by using a reference photo where Mitch is directly facing the viewer.

MitchReferencePhoto
Reference photo

We will work large to small: start with the outline of the head, placing guides as we go, and then draw the facial features within it. We want to make sure that everything is essentially in its place before we add details, because fully detailed features are more difficult to move than simple outlines.

1. Head Outline

Now, we measure proportions: How does the width of the face at eye level compare to the height? I’m seeing the width as about 2/3 of the height. And where is eye level relative to the top of the head and bottom of the chin? Quite near halfway. If there’s more height above the eyes than below, it’s because Mitch’s hair is sticking up in this photo.

As I study Mitch Grassi’s face to draw it, I’m struck with how perfectly his facial proportions match the general guidelines set forth in Jack Hamm’s classic guide: Drawing the Head and Figure. I highly recommend this book for anyone interested in drawing people well; it’s more in-depth and broadly applicable than my tutorials.

Let’s add a few notches to the guides to help us place our face outline and later the facial features within. Hamm advises dividing the line below eye level into fifths: the nose is at 2/5, and the mouth, at 3/5. Mitch’s face conforms to this.

Now, look for shapes and angles. I see an oval in the shape of the top of Mitch’s head, connecting through the cheekbones to the mouth.

Drawing this oval had me noticing that I’d set the width guide too wide, so I brought it in a little.

Slightly below the mouth and a little bit in from the head’s full width, the corners of Mitch’s jaw. (This will vary depending on the face angle on the photo reference.) Mitch’s chin has some rounding, but his jawline is quite angular; I’ve tried to draw what I see.

2. Facial Features

Measure proportions: eye breadth. Mitch’s face conforms to Hamm’s triangle rule: the corners of the eyes and the center of the mouth form the points of an equilateral triangle. (I moved the mouth slightly down during this step, as it looked too high.) The eyes, as usual, are one eye width apart, and the nose is one eye’s width.

Look for shapes and angles. Now that I’ve drawn in the eyes, I’m placing the imaginary eyebrow guides. Now I’m better prepared to place the hairline, which I saw was about halfway between top of head and eyebrows. I’m going to let the hair stick up a bit from the top of the head as I draw it. I’m refining the head shape as I go.

I add the ears: with how Mitch’s head is angled in this photo, they go from a little below eye level to a little below nose level.

3. Check Your Work

Time to remove the guides. I’m leaving in part of that oval below eye level, for Mitch’s cheekbones. Now let’s see if there’s anything to move before adding details.

I’ve brought in the sides of the face a bit, and adjusted the placement of the mouth and chin. I also went ahead and added some detail to the eyes.


Now shaping the eyebrows, nose, and mouth. Mitch has quite an expressive mouth; pay close attention to the curves and draw what you see.

This outline is essentially complete. I see some places where the lips and sides of the head don’t match the photo; I’ll adjust those as I add details.

Mitch’s angular bone structure tends to cast dramatic shadows, so I’ll show a quick-and-messy example of shading Mitch’s face.

I went ahead and made corrections to sides of head and mouth as I went. Adjusting proportions is a continuous part of the drawing process; keep an eye out for anything that’s keeping your drawing from looking like Mitch.

Here’s a recap of the steps:

This post is part of a series on how to draw members of Pentatonix:

  1. How to draw Avi
  2. How to draw Scott
  3. How to draw Mitch
  4. How to draw Kirstin
  5. How to draw Kevin

How to draw Scott

In this tutorial, we will capture Scott Hoying’s likeness in outline. We’ll apply these basic principles:

  • Work large to small.
  • Measure proportions.
  • Look for shapes and angles.

We’ll keep it simple by using a reference photo where Scott is directly facing the viewer.

ScottReferencePhotoCropped
Reference photo

We’re going to work large to small: first we’ll draw the outline of the face and hair, and then we’ll fill in the features within. A common rookie mistake is to start with details, but even carefully detailed facial features can fail to look like their subject, if their size and placement relative to each other aren’t quite right.

1. Head Outline

Study proportions. How does the height of Scott’s face compare to its width? I’d say that his face, hair included, is almost twice as tall as his face (at eye level) is wide. So I’ve drawn a rectangle a little less than twice as tall as it is wide, and a line of symmetry down the middle.

Where’s eye level? A woman’s or child’s eyes are nearly centered between top and bottom, but a man’s are typically above that due to his longer chin. Scott has a strong chin, but then, he also has tall hair…a rough measurement shows that it evens out! So I’m putting eye level at the halfway mark. Also, I see that the midpoint between top of hair and eye level is right about where his hairline is, and the midpoint between eye level and chin falls right between his nose and mouth. I’ve drawn guides accordingly.


Identify shapes. I’m about to try drawing Scott’s chin and jawline, but I want to be sure I get the shape right. What’s the width of the chin? I look for other facial features to compare it to. As it happens, the pupils of his eyes, the corners of his mouth, and the width of his chin nearly line up. So I draw guides for these, and then I can pencil in the chin and jawline with more confidence, placing the corners of the jaw where I see them: just below the mouth guide. (Don’t take this as a hard rule, as it will vary depending on the reference photo’s face angle.)


Next I’ll outline Scott’s hair. The line where head meets hair is a slightly rounded-off box with a little bit of a dip. The outline for the edge of the hair is quite distinctive: its part is directly above one of the eyes, and it extends boldly beyond the face box I’ve drawn. I draw what I see, and here’s what I get:


2. Place Facial Features

Study proportions. It turns out that I’ve already placed guides for nose and mouth as part of my earlier work of measuring proportions. But now that we’ve gotten this far, do they still look like Scott? I think the nose looks too long, so I bring it up just a little. I draw in the nose: in Scott’s case, it’s about the same width as the space between the eyes.

Identify shapes. Now I draw the imaginary line that eyebrows follow: blond eyebrows are still eyebrows, after all, and this line will help us shape the eyes in later steps. Now let’s check to see if our work so far looks like Scott…


I think we’re on the right track. Now we need, ears, and to give shape to the eyes and mouth. Carefully observe the eye shape; Scott’s eyes are shaped quite differently from Avi’s, for instance.

When drawing the mouth, watch how it curves: Scott is smiling slightly, so there’s an upward curve. (By contrast, a mouth in neutral expression tends to have a slight downward curve.) Draw what you see, bearing in mind that the bend of the corners of the mouth will make a world of difference to the expression.


3. Check Your Work

Now we’re ready to erase guides and see how the face looks without them.


I see a few things I need to fix: I’m going to adjust the eye shape: show the little creases on the corners. And then I draw in the beard. Scott’s beard is short and blond, so broken or easy-to-erase lines are best for delineating it until time to fill in its texture completely.


The “swish” of Scott’s hair is one of his most distinguishing features, so let’s capture it in broad strokes. Also, I spy some little marks under the eyes that I’m going to add.


And now we’re ready to refine the details as we shade or color. The eye shape and nose shape need some work; I’ll adjust them during the detail phase. But most importantly for now, our careful attention to overall proportions have given us a face that looks like Scott.

As you get accustomed to drawing a particular person’s face, you may find you can place features correctly with fewer guide marks and intermediate steps. You’ll learn to do the proportion-measuring and shape-finding in your head. Here’s a recap of what we did:


This is the second in a series of tutorials on drawing members of Pentatonix. The series so far:

  1. How to draw Avi
  2. How to draw Scott
  3. How to draw Mitch
  4. How to draw Kirstin
  5. How to draw Kevin

How to draw Avi

Many skills go into drawing a face: capturing a likeness, giving it expression, and adding detail through shading or color. In this tutorial, we’ll limit our scope to capturing Avi Kaplan’s likeness in outline.

Now, several factors combine to make Avi tricky to draw: his hairstyle and beard style change from one picture to the next, and his fluffy 2017 beard style obscures his underlying face shape, making it difficult to follow typical face-drawing guidelines. However, we can still apply basic principles of capturing likenesses:

  • Work large to small.
  • Measure proportions.
  • Look for shapes and angles.

We’ll keep it simple for this exercise: here’s a shot of Avi directly facing the camera, watching comments scroll by way too fast during a livestream. No hat or beanie, just pulled-back hair.

Avi_StaringIntentlyPhoto
This is a reference photo of Avi, directly facing the viewer.

We’re going to work large to small. It’s tempting to jump in and draw Avi’s eyes right away, but if not everything is in its place, the face won’t end up looking like Avi, however beautiful the eyes may be. So we start with the outline of the head and face, and a few guides to help us shape them. Then we’ll draw facial features within, and then check our work before adding more details. Before each next step, make sure that the lines of your current step are shaped like Avi!

1. Head Outline

Study proportions. How does the height of his face compare to its width? I’d say his face, beard included, is roughly twice as tall as it is wide. (Most people’s faces aren’t this long and narrow, but this is Avi + beard we’re drawing.) So I’ve drawn a rectangle twice as tall as it is wide, and a line of symmetry down the middle.

Where’s eye level? A woman’s or child’s eyes are nearly centered between top and bottom, but a man’s are typically above that due to his longer chin. When we include Avi’s beard length, we end up with top of his eyebrows about 1/3 of the way down the head. Speaking of which, the bottom of his nose is about 1/3 of the way from the bottom of beard. This will vary depending on face angle, so don’t consider these hard rules. But you can use this same approach with any picture: study the reference photo and identify proportions based on what you see. Now I’ve lightly penciled in some guides.

Identify shapes. Above the eyebrow line, I’ll draw two shapes: the crown of the head, and the hairline. The sides of Avi’s head are sort of flat, and then the top rounds off. The hairline in this picture is not far from the top of the head. I’m not worrying about finer details yet, just the greater curves.

Below the eyebrow line, I draw two shapes: where face meets beard, and the outer edges of the beard. The face-meets-beard line has an angle conveniently close to nose level. There’s some mustache and beard running through here, but I’m going to extend the imaginary lines for now, to halfway between nose and bottom of beard. For now, just draw an outer bound for the bottom of the beard; you’ll give the edges their fluffy chaos later.

Check your work. Does it look like Avi’s face shape? If not, adjust anything that looks off.

2. Place Facial Features

Study proportions. Where to place the bottom of the eyes relative to the eyebrows and nose? Eye corners relative to sides of head, and to each other? Eyes are generally 1 eye width apart from each other. What about the nose width relative to the eyes? Mouth width, and placement relative to beardline? Mark some guides.

Identify shapes. Make the imaginary curve that the eyebrows follow. I spy a line of continuity from nose through mustache, so I’ll draw that. Rough out the shape of the eyes, nose, mouth, and beard. (Avi’s eye-folds are so pronounced that I actually draw them separately from the eyes, even during the rough outline stage.) Avoid adding details until you’re sure that everything’s in place! If you find you need to move facial features around, outlines are easier to move than detailed drawings are. Draw the shapes you see. Adjust as you go if anything doesn’t look like Avi.

3. Check Your Work

Now I’m at the stage where I need to start erasing guides drawing outlines in more detail to make sure things look right.

I’ve added irises to his eyes so that he looks alive. I see that I forgot the ears while the guides were in, so I’ve just added those. Ears tend to run from eye level to bottom of nose, but Avi’s ears are partly hidden behind his beard. There are a few other things to adjust: going to adjust the eye breadth, and fix the beard shape…

I’m mostly satisfied with the outline. The face is a bit too narrow, the eye area too large, but these are exaggerations of Avis’ distinctive facial proportions, so if I’m going for a more cartoony style I don’t even feel the need to correct. Now I’m ready to add detail as I shade or color.

As you get more accustomed to drawing a particular person’s face, you may find you can place features correctly with fewer guide marks and intermediate steps, as you’ll do a lot of the proportion-measuring and shape-finding in your head. Here’s a recap of our steps:

This is the first in a series of tutorials on drawing members of Pentatonix. The series so far:

  1. How to draw Avi
  2. How to draw Scott
  3. How to draw Mitch
  4. How to draw Kirstin
  5. How to draw Kevin

Artist Etiquette: Give credit

The soul of art is creativity, and ideas for art concepts can come from anywhere. When you get an idea from another artist, give them credit for the idea they gave you. This builds goodwill in the art community. If you use another artist’s distinctive idea without giving credit, this may not go over well; it can even be seen as stealing. So please, give a nod to the source of the idea. Here’s a good example:

Brooke Borden (@brookeborden8) has drawn Kirstin Maldonado assuming the roles of many different fictional characters. Here Brooke has drawn an unusual choice: Kirstin as Edward Scissorhands:

When Emily (@Maldonadogrande) saw this, she wanted to draw her own fan art of Kirstin as Scissorhands. She mentioned in her post that Brooke’s latest piece had inspired her.

Mention the artist who inspires you by name, or even better: mention them by Twitter handle or quote their art. Artists love being credited for their creative ideas, and having their art shared by appreciative fans.